Shopify is one of the most popular e-commerce CMS in the market. It is estimated that over 800,000 businesses use it worldwide. With an intuitive administration platform, it comes with many handy built-in tools for sellers.
The platform has SEO features to help you optimize your content. It also stands out from the rest of CMS because of its free integration with eBay and Amazon without custom code.
If you want to get the most out of your eCommerce store, keep reading. We give you top Shopify SEO tips for business success!
9 Tips to boost your Shopify SEO
Are you wondering how to improve SEO on Shopify? Here are nine ways to enhance the SEO of your site with great tips from reputable Shopify SEO experts.
Table of Contents
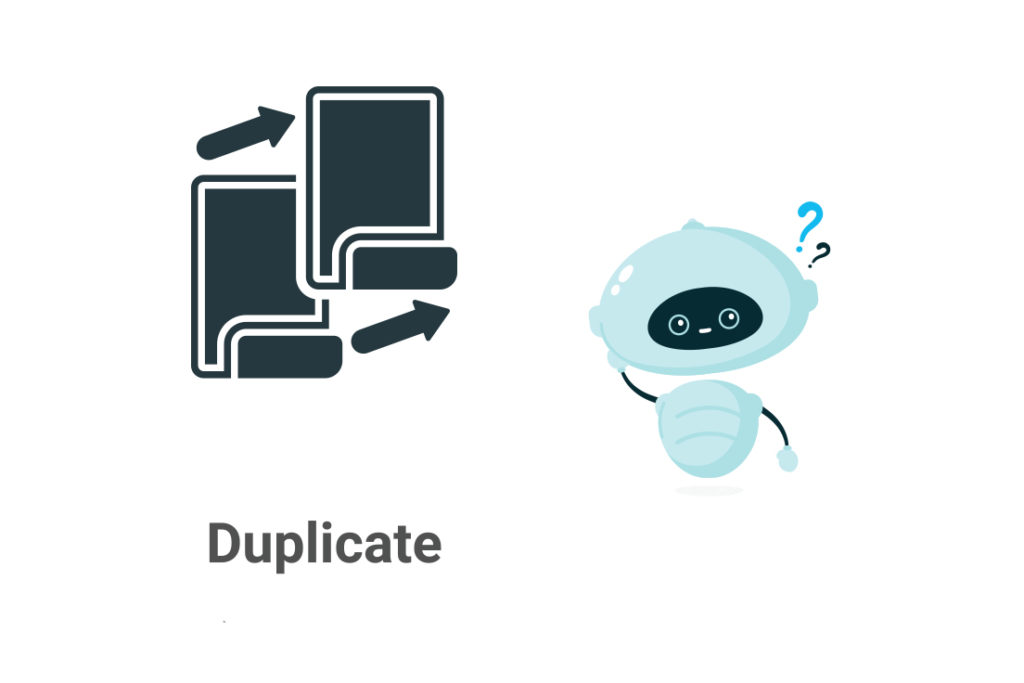
Remove duplicate content
Duplicate content is one of the most frequent challenges in online shops. This is because a single product can be showcased on multiple pages displaying identical or highly similar content on different URLs. You must address this issue if you don’t want Google to consider your site’s low quality.
The most common examples of duplicate content on e-commerce stores are:
- The same item in different sizes, colors, and slightly different designs
- Products on sales, promotions, and bestsellers
- Product filtering
- Product sorting
- Pagination
How to solve duplicate content issues
Use canonical tags
A canonical tag is a piece of HTML code utilized to tell search engines that you have some URLs with the same or similar content. With this tag, you can indicate bots, which is the “original page” that leads to the generation of other pages.
Using the canonical tags, you can solve Google’s doubt about which page to index and avoid duplicate content issues.
How to add Canonical tags on your Shopify website
- From the admin panel, go to Online Store > Themes.
- Choose the theme you want to edit, and click Actions > Edit code.
- Under Layout, click theme.liquid.
- On the line above the closing </head> tag, insert the following code and click save:
<title>
{{ page_title }}{% if current_tags %} – tagged "{{ current_tags | join: ', ' }}"{% endif %}{% if current_page != 1 %} – Page {{ current_page }}{% endif %}{% unless page_title contains shop.name %} – {{ shop.name }}{% endunless %}
</title>
{% if page_description %}
<meta name="description" content="{{ page_description | escape }}" />
{% endif %}
<link rel="canonical" href="{{ canonical_url }}" />
Avoid Domain Canonicalization
Domain canonicalization happens when you have several URL variations for your home page. The most common example would be the same URL with or without www.
- https://www.fandangoseo.com
- https://www.fandangoseo.com
- https://www.fandangoseo.com
- https://www.fandangoseo.com
If Google shows each of these pages separately, you’ll be generating duplicate content. To solve this problem, choose the main URL and redirect the others to this one.
How to solve domain canonicalization in Shopify
- From the Administrator go to Online Store > Domains
- Select the URL of your choice
- Click on Redirect all traffic to this domain
Create appealing Title and Meta Descriptions

The Title and the Meta Description are decisive elements to capture traffic to your website from the search results. Make sure you add relevant keywords to both of them.
Attract visitors with original Titles that invite them to click on it. Words like “high-quality, best-selling, great price..” are ideal for capturing the attention of potential customers.
Point out the benefits of shopping at your store in the meta description, for example, by highlighting a discount or free shipping.
How to set a title and description on Shopify
- From the admin panel, go to Online Store > Preferences.
- Enter a title and meta description.
- Click Save.
How to edit the title and meta description
- From the Search engine listing preview > click on Edit website SEO.
- Enter your title in the Page title field.
- Write the meta description in the search engine listing.
- Click Save.
Optimize your store images
Write descriptive Alt text
Images are another way of telling search engines what content you are providing on your online store. However, since crawlers cannot see images, you need to make good use of the alt text (alternative text) to tell them what it is about. These texts, also known as “alt attributes” or “alt descriptions,” are a key accessibility feature for visually impaired people as well.
It is also a good practice to carefully write the file names to provide additional information about the images to search engines.
Your alt text should be short and descriptive. Add the main keyword to both the alt attribute and the file name. Don’t add alt text to buttons and small images that have little relevance.
In online stores, images are a determining factor for a customer to decide whether to make a purchase. Moreover, with proper optimization, you’ll manage to appear in Google’s image search results, which can lead to more conversions.
How to add Alt text on from Shopify admin
- Go to Products > All products.
- Select the product that has the image you want to edit
- Click the ALT link
- Enter descriptive alternate text
- Click Done.
How to add alt text to a featured image of a collection or blog post
- Select the collection or blog post you want to edit
- Below the image click Update > Edit Image.
- Enter a descriptive text
- Click Save.
See what our expert Vanhishikha Bhargava says:

Vanhishikha Bhargava, Founder and CEO, Contensify.
“I have seen a lot of Shopify stores ignore two tactics that can really boost their SEO efforts and the organic traffic they drive to the store. First one is adding ‘alt text’ to their product images. When you’re taking so much time and making so much effort to perfect your product images, make sure you’re also making them visible on search. A lot of us consumers look for products on the search engine and then head over to ‘images’ to see which stores or what kind of products show up. This is an opportunity that you should not lose – a visual-driven consumer is more likely to convert. So make sure that you’re adding ‘alt text’ – which is basically a small description + keyword of what the product is about.
Second, is content marketing. Now as an online store, you might wonder what kind of content can you really create. Here’s the thing – based on what you’re selling, look at the search queries people make around your industry. For example, if you’re a fashion store, ‘current fashion trends’ is a relevant keyword for you. Similarly, if you’re selling health products, ‘diet tips for weight loss’ might lead you to get discovered by the right consumers. Content marketing is basically using the consumer’s purchase intent, behaviour, trends, and needs to attract them to your store. The modern consumer wants to make more informed purchases – which automatically means they first want to consume more knowledge about a product before buying it. Now instead of relying on other publishing sites to send traffic your way, start addressing these queries. That way you can ensure that when the consumer is ready to make a purchase, they’re buying from you and not another brand that shows up on the search. It’s also a great tactic to build up your brand and a good following.”
Linking structure
Internal links give structure to the content of your website. Depending on how you link your pages, visitors will have a better or worse user experience. Your linking structure also provides Google with information about your website’s hierarchy and how your content is interconnected.
Keep in mind that the closer a page is to the home, the more authority it gets. Additionally, you also provide extra strength to those pages that receive numerous inlinks. With this in mind, you should always link your category and product pages from the Home Page.
Google suggests having the maximum possible volume of pages in the first three levels of your website.
Check this guide to know step by step how to create a strong internal linking.
Use 301 redirects in Shopify
A redirect 301 is an HTTP status code response. It indicates a permanent redirect from one URL to a new one. Visitors or search engines are redirected to a different URL than the one typed into the browser or selected from search engine results. Proper use of the 301 redirects can improve your Shopify SEO by preventing you from having pages that lead nowhere.
When to use:
- Add 301 redirects when performing a site migration
- If you need to make modifications to your site structure
How to create 301 redirects manually from Shopify Admin:
-
- From the admin panel, go to Online Store > Navigation
- Click on URL Redirects
- Put your old URL in the from the field and the new Shopify URL in the to field.
- Repeat this process for all the pages you want to redirect
If you have a large number of URLs that you want to redirect, you can also use the Traffic Control – Bulk Redirects app.
See what our expert Paul Rogers says:

Paul Rogers, eCommerce & replatforming consultant, Founder of Vervaunt.
“Overall, everyone says Shopify isn’t great for SEO – whereas, realistically (whilst it could be more open), it’s just different and the average Shopify store is fairly well optimised out of the box. The issue is when migrating from other platforms and having to change every URL and move international sites to sub-folders etc, but this is more of a migration consideration. There are also various optimisations that can be applied with Shopify that people don’t always realise – for example, you can achieve top-level product URLs and create fixed breadcrumbs etc, you could feasibly use locales to create sub-folders (with likely operational overhead) and you can even get around all of the URL restrictions if you were to go down the headless route. I wrote this piece a while back that covers some of these areas.
I think my main tips for people looking at Shopify SEO are: avoid unnecessary use of javascript to render content where you can (it’s common for users to use a third party to serve the product grid, which would rely on javascript, for example), use top-level product URLs (and re-build breadcrumb logic), make sure you manage redirects properly when you migrate, make sure you build out your collections architecture to match your existing site even if this means building out manual versions of high-traffic filter pages etc (if you’re migrating) and then just make sure you get your data migration right (this is often a big one for SEO impact).”
Upload XML Sitemap to Google Search Console
Use an XML Sitemap to help Google find all your pages and speed up the indexation process. Shopify websites automatically generate a sitemap.xml file with a list of URLs. In it, you can find all the links from products, product images, pages, collections, and blog posts. Submit your XML sitemap to Google Search Console, so Google indexes your web pages faster.
Where is your Sitemap on Shopify Website
You’ll find the sitemap file at the root directory of your Website’s primary domain name.
Example: fandangoseo.com/sitemap.xml.
How to submit the Sitemap to Google Search Console:
- Sign In to Google Search Console.
- Select your website in the sidebar.
- In the left column, click on Sitemap.
- Remove outdated or invalid sitemaps (if any).
- Enter the last part of your sitemap URL in the ‘Add a new sitemap’ field.
- Click the Submit button.
Add a blog to your ecommerce website

A blog brings many benefits to an ecommerce Website. Quality content helps you rank higher on search engines. Plus, A well-maintained blog can also serve as a valuable platform for implementing effective link building strategies for e-commerce businesses, that can significantly boost your ecommerce business’s online presence and success.
Benefits of having a blog on your Shopify store:
- Increase website traffic
- Connect with your target audience
- Engage readers
- Generate more conversion opportunity
- People can share your content
- Get more backlinks
How to configure your Blog on Shopify store
Shopify Websites comes with a default blog called News. You can use this blog or create a custom one.
- From the admin panel, go to Online Store > Blog Posts.
- Click Manage blogs.
- Click Add blog.
- Title your blog, and select how you want to manage comments.
Shopify Edge SEO & Workers
What is Edge SEO?
Edge SEO is the practice of utilizing serverless technologies on a CDN server to create new Shopify SEO implementations, testing, and research processes. The most used technology right now is the Cloudflare Workers, they are a serverless application that lets you change the code as it passes through Cloudflare’s CDN. In other words, it allows you to execute JavaScript without impacting any underlying infrastructure.
The recent release of the Transform Rules, “HTTP Request Header Modification” allows Cloudflare administrators to set or remove HTTP request headers easily.
However, it is still necessary to use the workers contracting the enterprise plan for some other features.
Sloth
Sloth was the first tool to generate the Cloudflare Worker code to implement technical SEO fixes. The current version of Sloth 1.4 allows you to generate self-sufficient worker bundles to improve your SEO.
- Easy 301 and 302 redirect management
- Implementing Hreflang attribute
- Setting up AB testing
- Modifying the Robots.txt file effortlessly
- Implementing a range of security headers
- Collecting log files through the server request
It seems like Sloth will soon support Akamai EdgeWorkers and Fastly Edge support.
Edge SEO Capabilities with Shopify
URLs
In Shopify, it is not possible to change the URLs directly from the admin panel. The URL patterns that come with the platform are kept fixed, and we can not modify them as we could with other CMS like WordPress. With Edge SEO, you can put an end to this limitation and generate any URL.
For example, if you want the URLs of the products not to contain the categories, you’ll have to build code in Edge SEO. This way, we’ll generate clean URLs for products and avoid common duplicate issues in e-commerce stores due to category changes or products that can be showcased in multiple collections. It is vital to implement redirects from the old URLs to the new ones and make proper testing of this change to avoid any negative impact on your site.
A/B Testing
Running A/B tests, you can check different variations of web pages to see which version attracts higher organic traffic or converts more.
You can easily set-up an AB testing campaign from the Sloth dashboard. Select AB testing on the sidebar menu and click on “Add campaign”.
Robots.txt
Although Shopify had limitations to modify the robots.txt before, it is now open to be edited by all Shopify merchants.
To modify the robots.txt directly from Shopify, you must first remove any customizations or workarounds such as Cloudflare. Then you just need to follow the steps described below.
- From the administration panel, go to Online Store > Themes
- Click Actions > Edit Code
- Click Add a new template > select robots
- Click Create template
- Make the necessary changes to the default template and save.
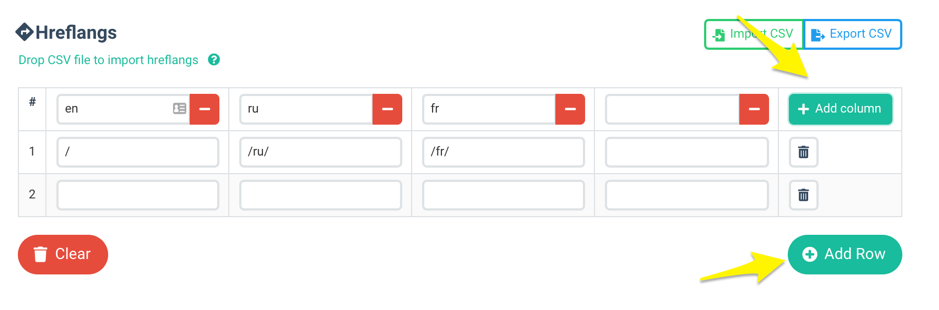
Hreflang
Using Sloth Hreflang Manager, you can import a CSV with its respective Hreflang assigned to each URL and language. Then, Sloth will transform this code into code ready to be injected by Cloudflare Workers.
You can easily manage the Hreflang in the Sloth dashboard, adding in rows and columns or deleting them in the table.
Logs to S3
Being able to check what GoogleBot sees on your website is crucial in technical SEO. By having your Shopify store on shared hosting, you cannot download the log files. However, with the Cloudflare Workers, it is possible to capture the logs and send them, for example, to the Amazon S3 bucket. Once we have them on Amazon S3, it is straightforward to connect them to FandangoSEO. You’ll be able to analyze traffic from Googlebot and take action to improve your crawl budget, as well as correct any SEO issues on your website.
Now you know how to improve your Shopify website! I hope you find this SEO guide helpful. I’d love to hear from you if you can think of any other relevant Shopify SEO tips to add to this list. 🙂
Also, let me know in the comments if any questions arise. I’ll be happy to answer any doubt.
Last Updated on February 10, 2024 by Victor Perez Vas